How To Make a DIY Birthday Crown with a Crown Template
This post contains affiliate links, which means I may earn a small commission at no additional cost to you if you click through the link and make a purchase. For more information, click here.
Birthday crowns are a lovely addition to birthday party embellishments. My kids totally love them and are proud of wearing them. When a friend of mine asked if I can make a birthday crown for her daughter, I was thrilled and accepted the challenge (I have never made a birthday crown before). My friend wanted a reusable violet crown with a flower design. I went on the web looking for a birthday crown inspiration. As I always like a challenge, in the end, I made a birthday crown template myself. I got fully hooked on the birthday crown craft! In this post, I share the steps on how to make a felt crown and a FREE birthday crown template.
If you want to add a birthday felt banner as the birthday party decoration, visit How to make easy no-sew felt banner.

Basic Instructions for Birthday Crown
The felt crown looks amazing. It is made from felt and completed in a combination of hand stitching and a sewing machine. The stitches used are a running stitch, french knot, and straight stitch. If you prefer, you can sew the crown entirely by hand. Visit my article for the guide on hand embroidery stitches.
You need a few things to make the birthday crown: felt, embroidery floss and needle, scissors, elastic, pins or clips, and glue!
For the birthday crown size, you'll need to measure around your child's head where the felt crown will sit. The child of my friend (3 years old) measured 52 cm (20.5 inches). The finished DIY birthday crown should be approximately 2 cm (3/4 inch) smaller than the head measurement. If the elastic is stiffer, then 1,5 cm (1/2 inch) will be enough.
If your child is not nearby to make the measurement, you can use this head circumference size chart as a reference. Four kids that I measured follow exactly the table measurements.
The length of elastic needed will depend on the width of felt available. I used a 30,5 x 22,5 cm (12" x 9" inches) felt sheet. The required elastic length is: head circumference - felt crown width = length of elastic. For me, it was 52 cm - 29 cm = 23 cm (20.5" - 11.5" = 9" inches).

Felt Birthday Crown Free Crown Template
Materials & Supplies for DIY Birthday Crown
You’ll need:
Printed Free Felt Birthday Crown template - to download the file, subscribe to the FunClothCrafts newsletter. In the newsletter, you find a password to the subscriber's Free Downloads Vault
2x Felt Sheet 9” x 12” (22,5 cm x 30,5 cm) - find great quality felt at Benzie Design or find more buying options in the Types of Felt section of the How to Sew Felt blog post
Felt scraps
10″ (25 cm) of elastic (1 inch wide, 3 cm wide) or FOE (fold over elastic)
Scissors with pointy ends (my favorites are KAI 5 1/2 inch Embroidery Scissors or KAI 6 1/2 inch Sewing Scissor)
Glue that works on felt (Elmer's crafts bond fabric glue or Beacon Fabri-Tac permanent adhesive)
Embroidery floss (DMC Embroidery Floss Pack)
Embroidery needle (Clover No. 3-9 Embroidery Needle)
VELCRO (to make the birthday crown number reusable)
Sewing meter (to measure your child's head circumference)
Pins (Clover Patchwork Pins) or Clips (Clover Wonder Clips)
Optional:
Freezer paper sheet (optional - check out my tutorial 6 Techniques on how to cut out felt to find your favorite felt cutting method)
Iron (optional for freezer paper - I have Rowenta travel iron)
Jersey or cotton fabric to cover the elastic
Rotary cutter (Omnigrid Rotary Cutter 60mm)
How to Make a DIY Birthday Crown
Print and cut the felt crown front. Print the free Felt Crown template from Free Downloads Vault (subscribe to the FunClothCrafts newsletter to get access) on paper or directly on the freezer paper sheet. Following your preferred how-to cut out felt method, carefully cut out the traced crown front.

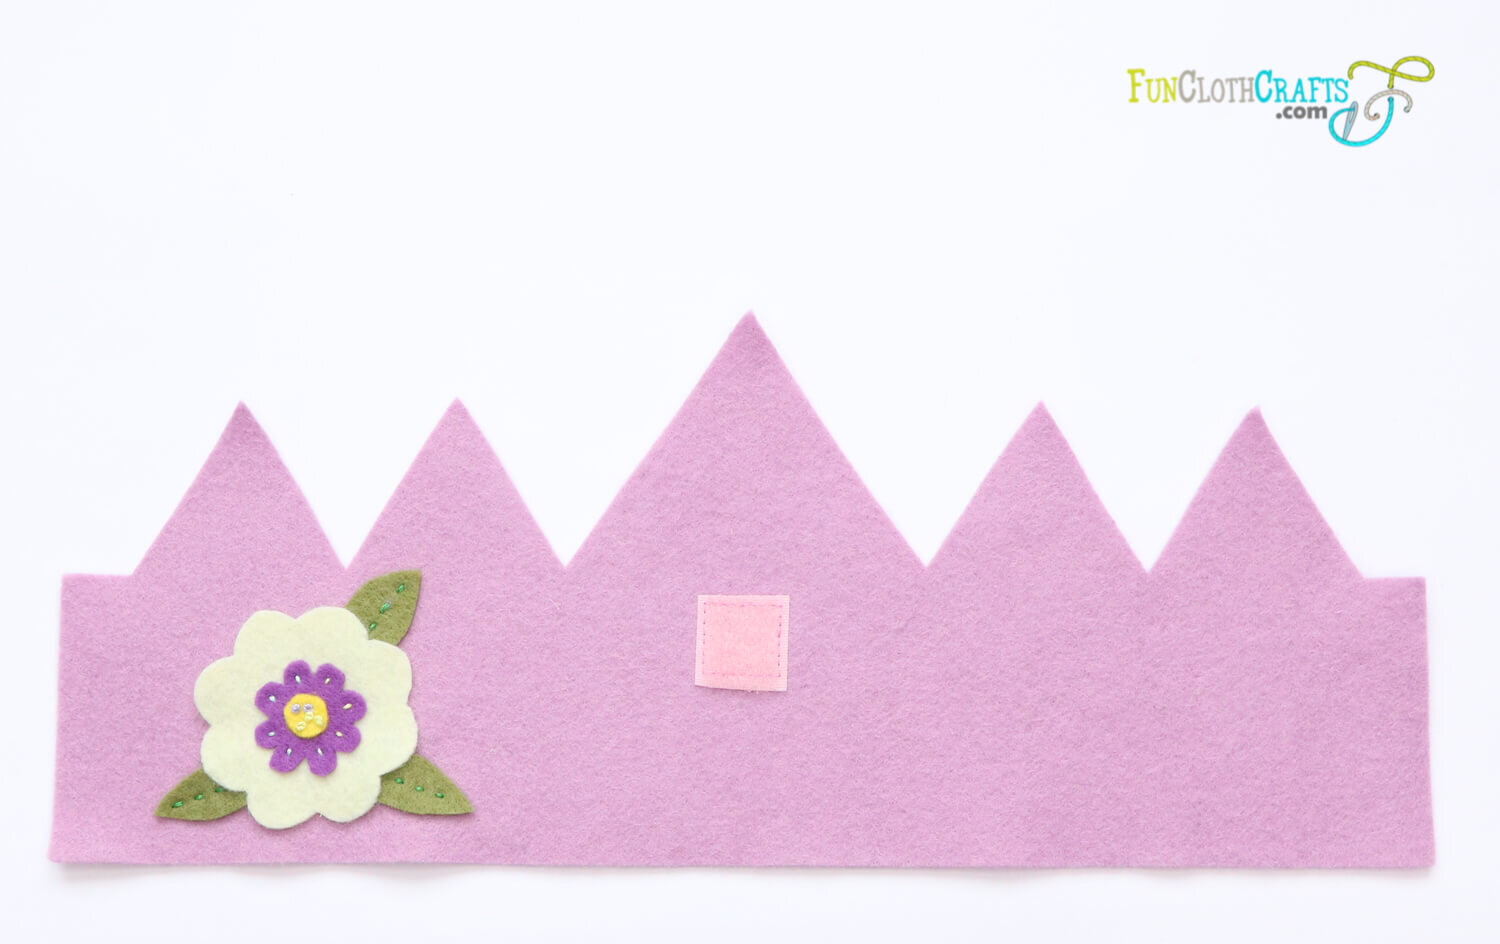
Birthday crown front
2. Decorate your felt crown with the felt flower. Cut out the flower pieces. Embroider the yellow centerpiece to the violet flower piece with 5 french knots. Glue (with a small dab) the leaves to the white flower piece. Following the birthday crown template, embroider with straight stitches the violet flower through the white flower and the crown front. Embroider the leaves with a running stitch. TIP: you can use glue or pins to hold the pieces in place. For more on hand embroidery stitches, visit my post 9 Hand Embroidery Stitches for Felt.
For more felt flowers and leave designs explore How to make stunning felt flowers.

Birthday crown flower pieces

Birthday crown flower embroidery

Birthday crown leaves attached
3. Decorate your crown with the number. Cut out the number pieces. If you want to make the number reusable, sew a small piece of Velcro hook to the purple oval. Glue the number to the blue oval piece. Glue the blue oval piece to the violet oval following the birthday crown template. Sew a small piece of Velcro loop onto the crown front, making sure that the number is in the right place. TIP: You can hand sew all the elements if you prefer. If you choose the number not to be reusable, you can hand sew or glue the completed number to the crown front.

Birthday crown number pieces
Birthday crown - Velcro loop attached

Birthday crown - number completed
4. Decorate your crown with butterflies. Cut out 4 felt butterflies. Following the birthday crown template, embroider the butterflies with running stitches to the crown front.

Birthday crown - butterflies sewed with running stitch
5. Sew the felt crown pieces together. When the birthday crown front is completed, place it on top of the other felt sheet and pin it in place. Sew the crown front to the crown back by sewing along the top and bottom edge. Leave the sides open. Use a minimal seam allowance (between 1/8" and 1/4"; 0,4 cm to 0,6 cm). When completed, cut the crown back around the crown front shape, leaving a 1/8" (0,4 cm) edge. Trim the sides as well without leaving an edge.

Birthday crown - place the front crown piece onto the back piece

Birthday crown - attach the crown’s back piece sewing the top and bottom edge close to the edges
6. Attach the elastic. Use your kid's head circumference measurement to determine how long your elastic needs to be (explanation in Basic Instructions for Birthday Crown). Cut the required length of elastic.
You can cover the elastic in a jersey or cotton fabric. Cut 5" (12 cm) wide jersey fabric and approximately 11" (28 cm) long. Sew the long ends together with a zigzag stitch (I used a serger, but a zigzag stitch will do). Flip the fabric so that the stitch is hidden. Insert the elastic reaching the edge of the fabric and sew it in. Sew the other end of elastic to the other edge of the jersey fabric. As I forgot to take pictures of these steps, I use photos from the crown I did next.

Birthday crown - elastic jersey cover
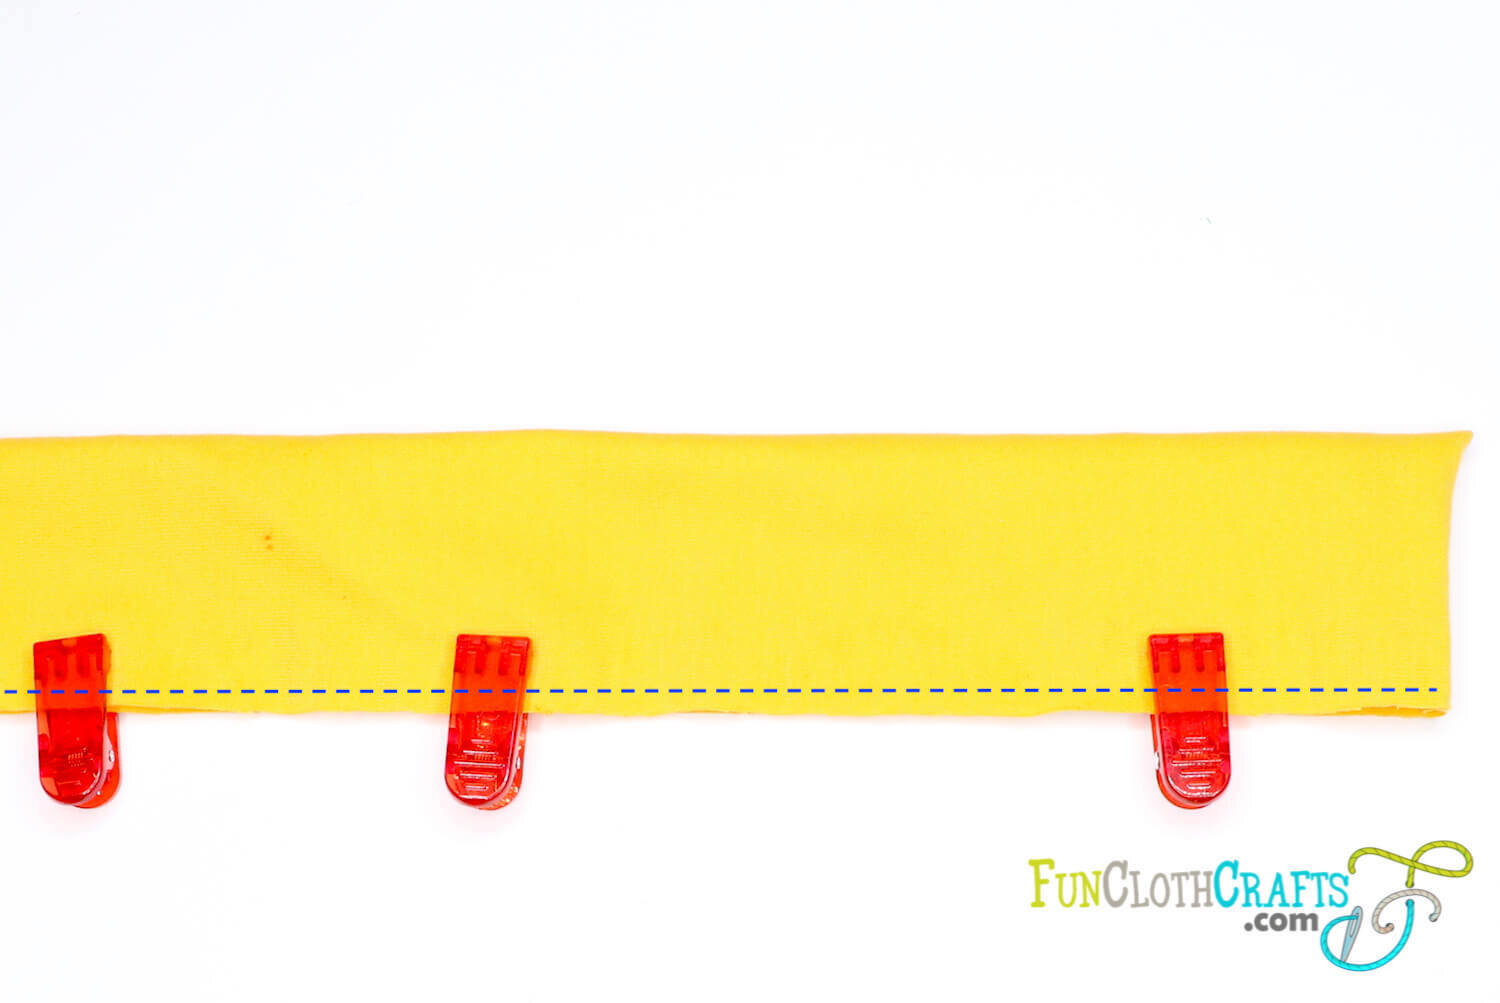
Birthday crown - fold the fabric and sew with zigzag close to the edge

Birthday crown - flip the jersey fabric, insert the elastic and attach on one edge

Birthday crown - sew the elastic in on the other side
Insert the elastic about half an inch inside the opening on one side of the crown and pin it in. Then sew the opening closed, catching the elastic as you go. Do the same for the second side. I went three times over the elastic to hold it securely in place.

Birthday crown - insert the elastic and pin it in place

Birthday crown - sew the opening, catching the elastic as you go
7. The felt birthday crown with the free crown template is ready. Now it's time to try it out :)
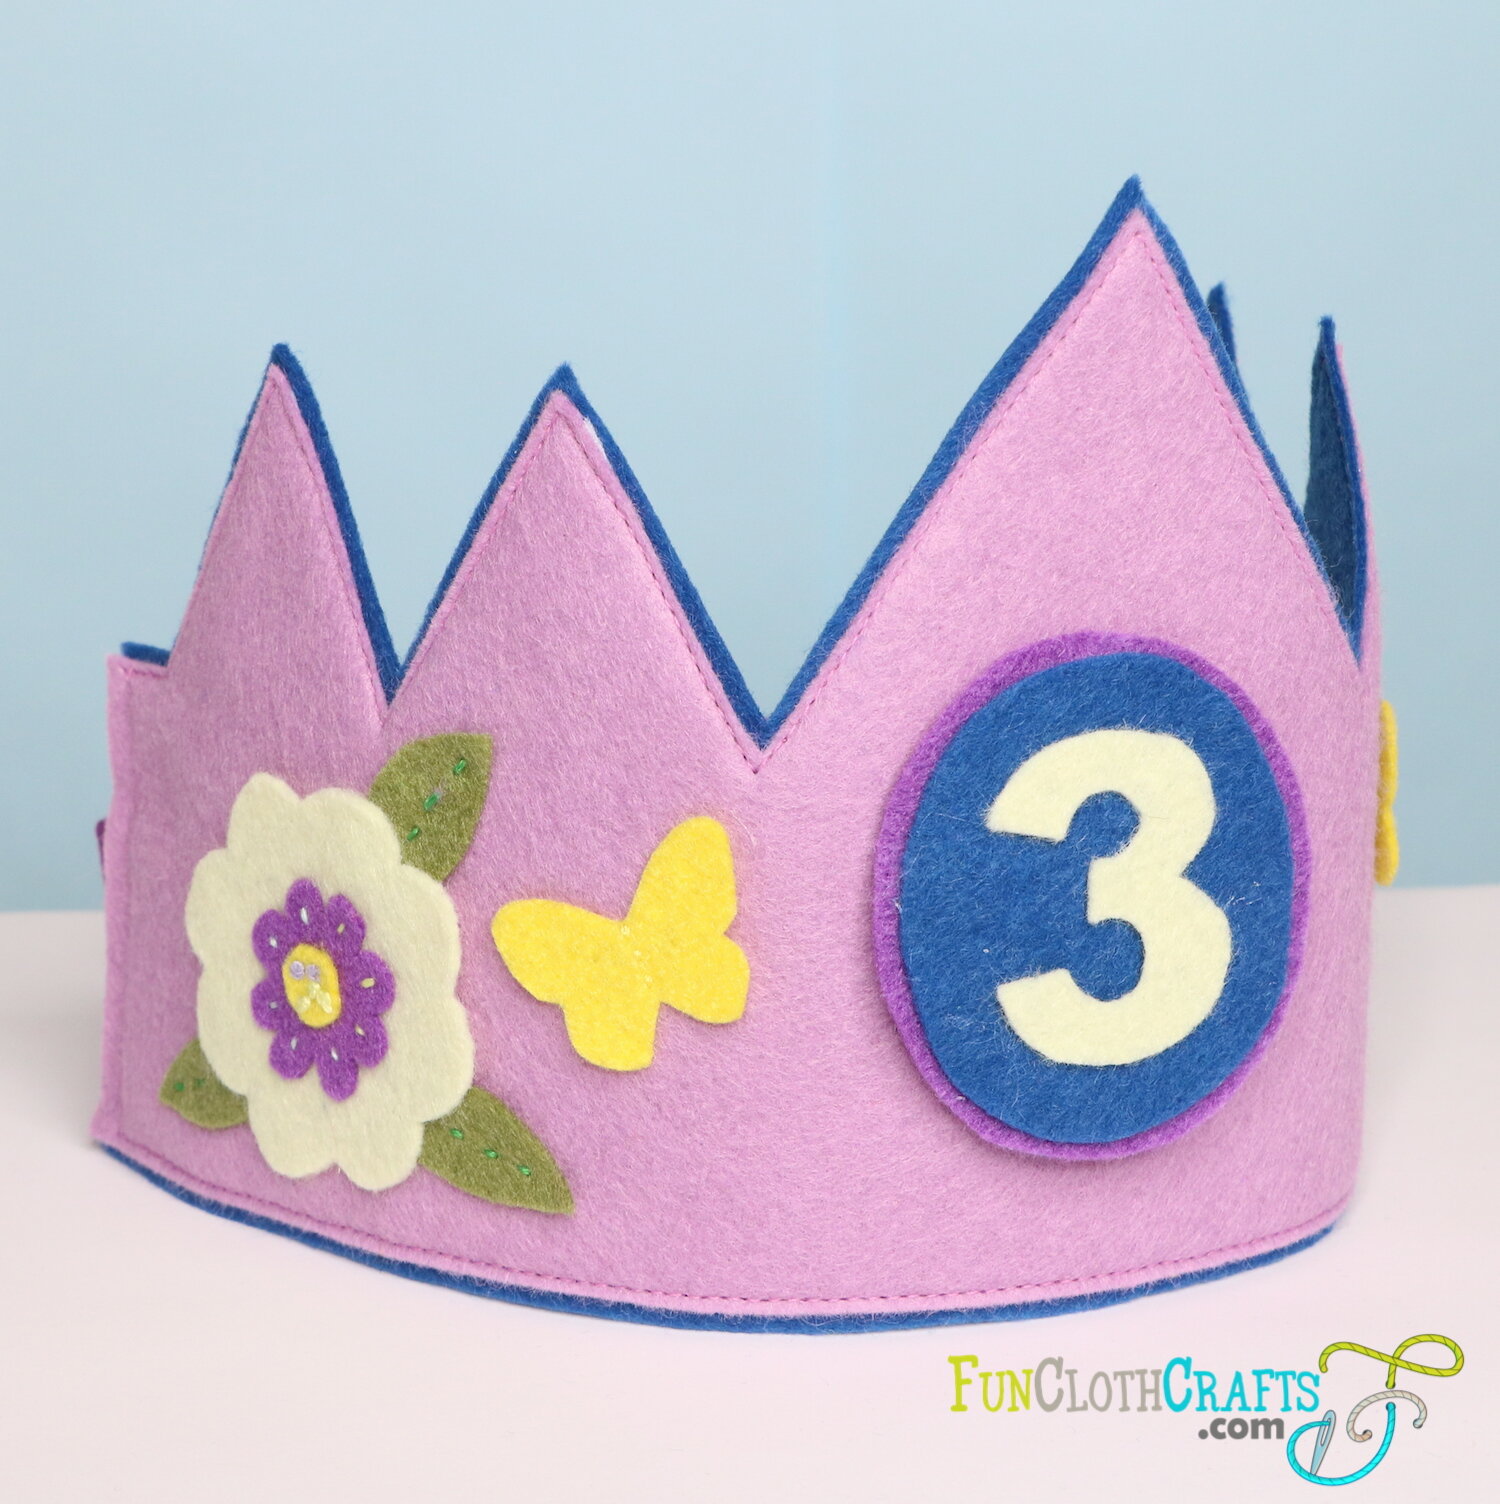
DIY Felt Birthday Crown

DIY Felt Birthday Crown - view from back

Birthday Crown with a Crown Template Conclusion
I enjoyed working on this felt birthday crown tutorial. Careful sewing felt crowns might be addictive :) Once you complete one crown, the next one is easy to make. So sew as many as you can. There is no age limit to wearing a birthday crown. However, I imagine kids enjoy them the most.
Thank you for reading and crafting with me! What are your thoughts? Did you like the free felt crown pattern? I would love to see your finished felt crowns. So if you like to share it, please send me your pictures. I welcome any feedback as it is important to make my products better. Don't hesitate to contact me with your suggestions.
Be sure to visit more on this website for free embroidery and sewing tutorials to help you out as you stitch my patterns.
If you find this post helpful, please take a moment and share it on social media.
Feel free to join my mailing list! You’ll receive updates on new patterns, the latest tips & tricks, and special promotions.
Let’s craft together!
XO, Anna
Copyright 2021 by Fun Cloth Crafts
Pattern may be copied for noncommercial use only. You can use it to make as many Birthday Crowns as you want for yourself or as gifts, but please don’t make any for sale.